
Find Our Latest Video Reviews on YouTube!
If you want to stay on top of all of our video reviews of the latest tech, be sure to check out and subscribe to the Gear Live YouTube channel, hosted by Andru Edwards! It’s free!
Thursday October 4, 2012 8:02 pm
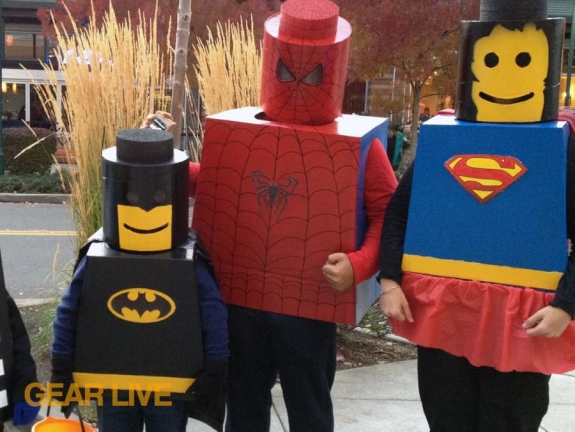
How to make your own LEGO Superhero Halloween costume

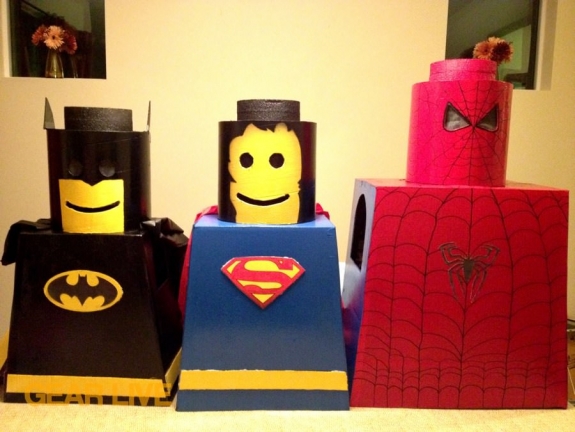
It's October, and that means that there are many people looking for a great Halloween costume. Rather than buying a cheap costume-in-a-bag, why not get creative and build something awesome? That's what we did when we became LEGO Superheroes last year, and we ended up getting non-stop compliments when it was time for tick-or-treating. Wanna know how we did it? Read on!
BACKGROUND

Last year I wanted to have an amazing homemade costume. I'm 40, and when I was a child we didn't have Halloween stores to buy a pre-packaged item--we had to use our creativity. I think that is something that has been lost a little now that everyone has such a hectic schedule. If you plan this out like we did, we spent maybe 15 minutes per day at the most over a couple of weeks. If you don't plan (it happens!) then hopefully you will at least have a weekend prior - waiting for the paint to dry probably took the most time. I told Andru I wanted to make something and he was really hesitant, so I had to sell this idea!
Gallery:


First, although I have plenty of tools that I received when I bought my first home as a single woman, we hardly ever use them. I would not say we are big home improvement types and as far as my crafting goes, I know how to use a glue gun but no sewing, knitting, crocheting, etc. I asked Andru and his son, Alijah, what kind of costume they wanted and we agreed on being superheroes. After a bit of research, we came across an Instructables tutorial showing how to make your own LEGO hero outfits, and that's what we settled on. The thing is, we wished there was a bit more detailed instruction on how to make them, so after doing it ourselves, we figured we'd share it here.
SHOPPING FOR MATERIALS
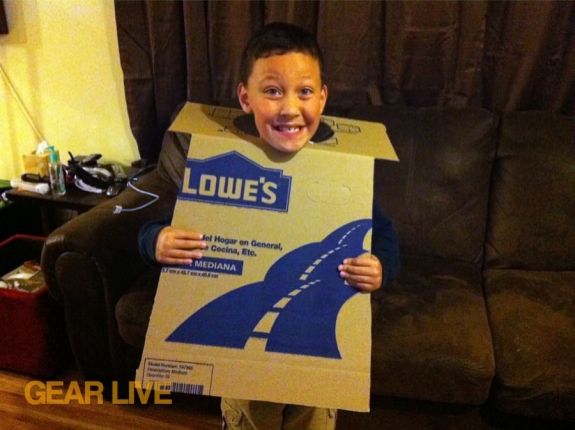
First thing we did was go to Lowes with a shopping list:
- Boxes - we used a large box for Andru, and Alijah and I used medium sized cardboard boxes
- 12" Cement form tube (found near construction materials) - try on the different sizes if you have children, as these are for the heads - you don't want the diameter to be so wide it is the size of their shoulders. I think we might have gone 10" since we have a 7-year-old - the next size would have given a little more room for dad but was just too big for our son.
- 3/4" Styrofoam Insulation (found near fiberglass insulation)
- We ended up buying sponges from a dollar store for the inside of the head but this was on our original shopping list but I just couldn't find at the store
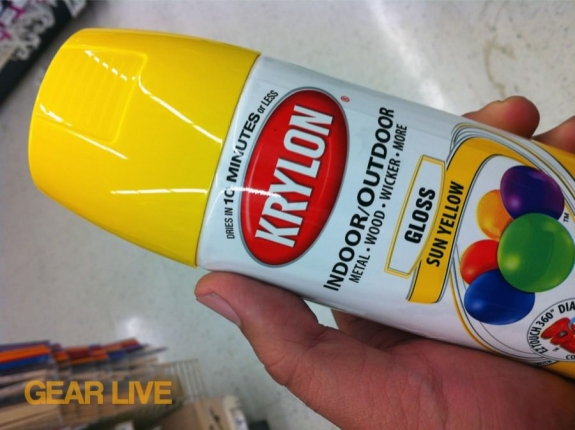
- 2-3 cans of Krylon Sun Yellow spray paint: This is a very close match to "LEGO yellow"
- 2-3 cans of red/blue/green/other spray paint (color of body, your choice)
- A sheet of copy paper
- Styrofoam circles: We ended up finding these at a dollar store (and I honestly have no idea what these are really for)
- Packing tape
- Gorilla glue
- Speaker fabric (the kind you see through)
- X-ACTO knife
BUILDING THE TORSO
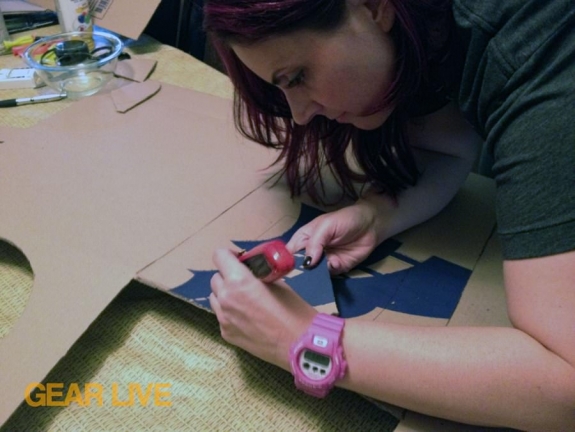
The first thing we did was cute the cement tubes for our heads. The instructions we found were for adults and said to make them an even 12" each, however for our little one we made it 10" because we didn't want him to balance to heavy of a headpiece. One thing we did not think about was it was a bit of a struggle for him to walk around since the costume did limit how much we could see below us. This was tough when going somewhere with steps, so don't make the head too large. For mine I had 11" and Andru had the largest head so his was 12". We took a rubber band and a ruler and a pencil to mark the line all the way around and make sure it was even. We thought we might have to purchase some type of dremel tool to cut through the tube but since I purchased a new, sharp X-ACTO knife, we were able to use that to cut the tube. It was not an easy cut, but certainly not hard.
After we had the heads cut we decided to measure our shoulders, hips (where the bottom of the costume would be), and the height that we wanted. The body should follow somewhat of a triangle shape. We cut the Lowes boxes into four pieces, cutting at the side, as we already had a straight line set up for us to follow. Once we had smaller, more manageable pieces of the box/body we were able to take our pencil and starting marking up the designs. We used the natural fold/bend of the box top as the shoulder/neck area so don't cut that part off. Your first piece should look like the image above.
Once you have this first piece done, trace its shape on another piece of cardboard for the other side. One mistake we made was making the hole for the head too large. If I did it again I would wait until you get the sides done because you could end up making that hole too large if the person is not very wide.
You now need to measure each person from front to back to determine how large to make the sides of your costume. You don't want it too tight since it is held together by tape but also not too big, especially if you are going to load this in your car to go to a party. Make sure to measure the widest part that your costume will cover. For me I did not want the costume too long so it had to go over my booty, so I kept the length just at my hips and measured there. For Andru, he is wider at belly button level than his hips so we used that as our spot to measure. Again, don't want it too tight!

After you have the sides cut you need to cut an arm hole before attaching. We used a bowl as our template. Each person had a different size because you don't want to be able to see too much of the inside of the costume. To allow for more mobility we brought the bottom of template into a straight line so it looks more like an arched entryway. Keep these fairly close to the top of the panel - no more than 3 inches down. You should now have all four panels and can put them together but first you need to cut the circle for your head. Be sure to lay down the front and back panels with the tops overlapping, that way you can cut out the space for your head, be sure the circumference is slightly smaller than the cement tube you purchased people can't see your shoulders and body from the top. When getting ready to tape your body together a helpful tip is to put the outside of the Lowes boxes, the side that has their logo, on the INSIDE of our costume which will save you some paint. Keep any box scraps because you will use them for the top of the head and the logos on your chest.

We taped each box using duct tape and taped on the inside first and then once we had all four pieces together taping again on each seam on the outside of the body.
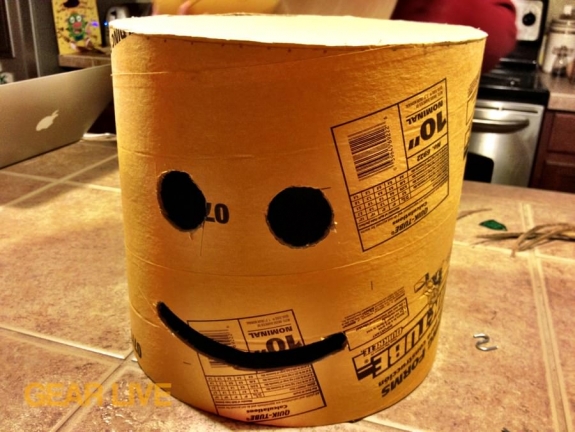
BUILDING THE HEAD

Now comes the head! We used a regular piece of paper to create our template and a pill bottle for the eyes. The mouths were a bowl that we used (same bowl twice and just connected the ends). We made sure to put the head on so to place the right spot for our eyes so it was easy to see out of. The top was traced into our scraps of cardboard which we wedged in (very tight fit) and then taped from the inside. Do not put any tape on the outside since it will show up when you paint. The small circle tops on our head were pieces of styrofoam that my mom found at the dollar store for us.
We needed to put some type of foam in the head so when we moved around they stayed in place, so we bought a pack of sponges and glued 2 or 3 together and then the next day (after they dried) we glued them to the inside of the head - in the back, on the sides, and at the forehead - just keep testing to see what fits.
PAINT YOUR DESIGN
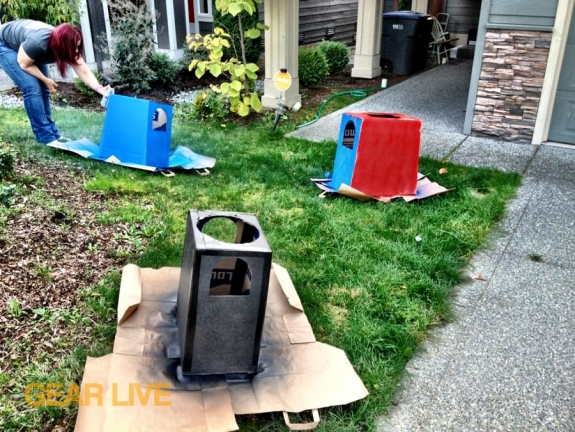
Now that the construction of the body and head are done, you are ready to paint! For our Batman costume was added some ears and the shape of the eyes on Spider-Man were different than the others, so this is where you get to be creative. As we mentioned, we went with Supergirl, Spider-Man, and Batman for our costumes, and we just did copied the artwork that we found in comic books and Google image searches. We taped the mesh speaker cover to the inside of the head to give the eyes a dark look that you can still see through (or, in the case of Spider-Man, white.)
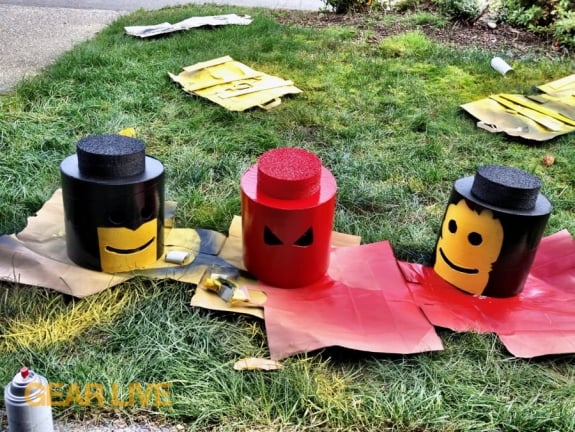
That's pretty much it! As we said, pick whatever design you'd like. While we went with these specific superheroes, you can certainly choose other superheroes, or any LEGO-ize any other character you can think of. It's all up to your imagination. Once you have the heads and bodies constructed, it's all about the paint. We were able to find logos online, and printed those out and colored them in. For the Spider-Man lines, we used a paint pen, and just drew the webbing onto the body and head. It isn't perfect, but it definitely passes, and...hey...it's home made! It's not supposed to look perfect.
If you give this a try, let us know. Hit our comments section--we'd love to hear how it turns out!


Forum Discussion
Come join the discussion on this topic over on the Gear Live message boards. You need to be a member to participate, so sign up if you haven't already - it's free!