Find Our Latest Video Reviews on YouTube!
If you want to stay on top of all of our video reviews of the latest tech, be sure to check out and subscribe to the Gear Live YouTube channel, hosted by Andru Edwards! It’s free!
Wednesday September 16, 2009 1:33 pm
Don’t wanna wait for iPhone MMS? Enable it right now!

Okay, we were all disappointed by AT&T’s decision to delay iPhone MMS to early fall, but that doesn’t stop ambitious folks such as ourselves from finding a way around it. And we have. I can confirm that I was able to get MMS working on my iPhone 3GS with about 3 minutes worth of effort. You wanna do it to? Read on for complete instructions for enabling MMS on iPhone 3.1.
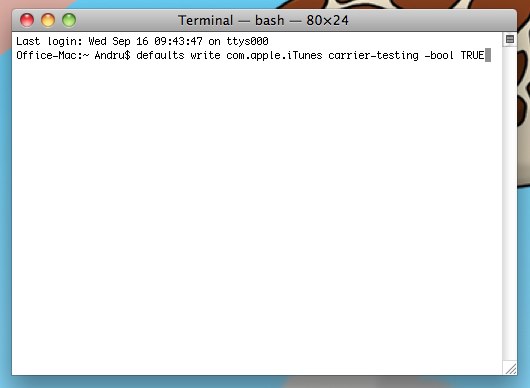
First things first, You need to enable IPCC updates, which is supported in iTunes 8.2 and 9.0. If you have either of those installed, you’re good. Here is how to enable IPCC on OS X and Windows 2000, XP, and Vista:
Mac OS X:
- Close iTunes if it is open
- Start Terminal (Applications > Utilities)
- Run the following command: defaults write com.apple.iTunes carrier-testing -bool TRUE
Windows 2000/XP/Vista (32-bit):
- Go to Start -> Run (
- type in “cmd” and hit enter
- Type/copy+paste this into the command console that comes up: “C:Program FilesiTunesiTunes.exe” /setPrefInt carrier-testing 1
- Hit enter
Windows XP/Vista (64-bit):
- Go to Start -> Run (
- type in “cmd” and hit enter
- Type/copy+paste this into the command console that comes up: “C:Program Files (x86)iTunesiTunes.exe” /setPrefInt carrier-testing 1
- Hit enter
Okay, now that that’s done, you are ready to update your iPhone with a modified carrier file bundle. Don’t worry, this won’t break anything. All it will do is give you an extra menu in the Network settings area, where you can enter the network settings that will enable MMS.
Right-click and save this file to your computer. Once you have it, follow the following steps:
- Download the file to some location on your computer
- Plug in your iPhone
- Start iTunes
- Click on your iPhone in the device listing in iTunes
- Alt-Click the “Check for Update” button (Shift-click in Windows)
- Browse to where you saved the IPCC you downloaded
- Select the file and click Choose (or OK on windows)
- Reboot your iPhone
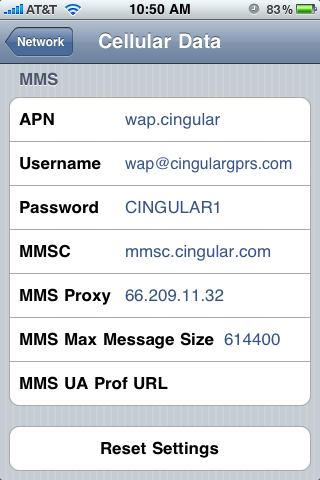
Okay, once your phone has rebooted, you just need to enter the appropriate settings that will allow MMS messages to be sent and received. To get where you need to be, go to Settings -> General -> Network area. You should see a new Celullar Data Network option. Go into that area, and enter the following settings:
- wap.cingular;
- Username: wap@cingulargprs.com;
- Password which is case sensitive: CINGULAR1;
- mmsc.cingular.com;
- MMS Proxy: 66.209.11.32
Now back out of that menu, because we are all done, my friends.
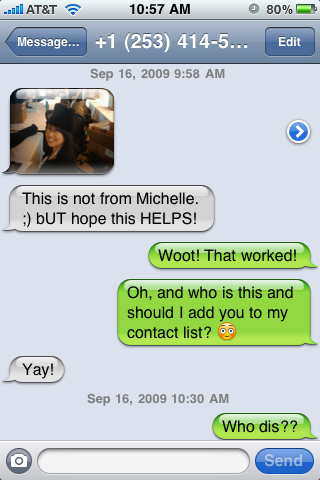
You should now be able to both send and receive MMS messages from your iPhone 3G or iPhone 3GS, enabling such riveting conversations as the one above.
Big props to Aaron Krill and SoftSailor for the parts they played in getting all of this to work!


