
Latest Gear Live Videos
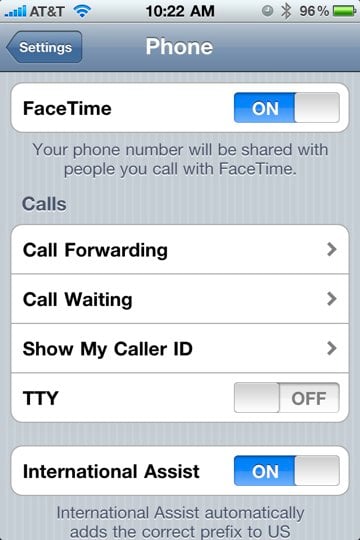
How to enable and disable FaceTime on the iPhone 4

Posted by Andru Edwards Categories: Apple, Smartphones, Handhelds,
FaceTime is one of the major new iPhone 4 features that set the smartphone apart from others, but we’ve been hearing that quite a few people are unable to place a FaceTime call from their iPhone 4, despite both parties being connected to Wi-Fi, which is the only requirement. In fact, we had the same issue when we tried to fire up our first FaceTime chat while at the Apple Store during iPhone 4 launch. I immediately walked over the to Genius Bar, figuring that my iPhone 4 wasn’t recognizing the fact that it had a front-camera or something, and the Genius was stumped, too. He was also in charge of handing out iPhone 4 units, so we didn’t have his full attention anyway. While he was doing his thing, we looked through the Settings area to see if there might be something there. As it turns out, there was.
For whatever reason, not all iPhone 4s are shipping with FaceTime enabled. The person I was with had just bought his iPhone 4, same as I did, and his had FaceTime enabled by default, while mine was disabled by default—both straight out of the box. If you are experiencing the same, first thing you should do is go into Settings, then Phone. Right beneath your phone number will be the FaceTime toggle. Switch it to “ON” and you are good to go.
Advertisement
How to fix the Nexus One 3G issue
Posted by Andru Edwards Categories: Smartphones, Handhelds, Wireless / WiFi,
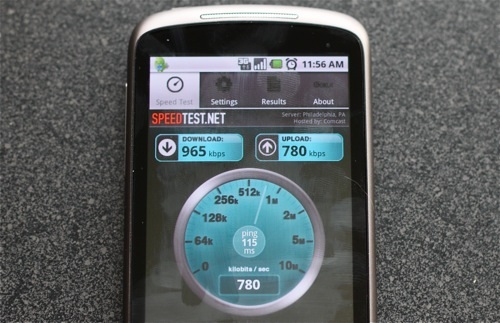
If you’re a Nexus One owner, you may be well aware of the 3G issue that the device has, where it won’t connect to (or stay connected to) 3G, constantly falling back to EDGE. We know not all have experienced this oddity, but it’s enough of a problem that we’ve been getting emails about it, asking if there was a fix. Luckily, Kevin Tofel over at jkOnTheRun seems to have figured out a fix, and it’s simple to do:
- Go into Settings
- Select “Wireless & Networks”
- Choose the “Mobile Networks” option near the bottom
- Go into the “Network Operators” section. The Nexus One will do a search for GSM networks around you.
- When the search is complete, tap the “Select Automatically” option. The phone should respond with “Registered on network.”
That should do it! According to Kevin, he hasn’t been able to get 3G access from his home in the 10 days that he’s had the device. After doing the above, he’s been speeding along on 3G non-stop, even after reboots. If you’re experiencing similar issues, give it a try, and let us know how it works for you!
Read More  | jkOnTheRun
HTPC Building Series: The Final Tally
Posted by Andru Edwards Categories: Features, HDTV, Home Entertainment, Music, PC / Laptop, Software,
Check out out HTPC on a Budget series and join us in building a great HTPC for under $1,000.
The challenge presented at the beginning of this process was for us to build a great home theater PC while sticking to a budget of $1,000. We knew we were up for the challenge, and wanted to walk you through that process with us. Here’s what we’ve done, as a refresher:
- Let’s Build a Budget HTPC
- Selecting Our Hardware
- The MSI 7411 Motherboard, and Why It Rocks
- Achieving Great 5.1 or 7.1 Surround Sound
- Driving multimedia content to the HTPC
- The ATI TV Wonder 650
- Laying Out All The Components
So, now that we have reached the end of this process, we need to take a look at how we did, right? Were we able to stick to our budget? Let’s see how we did…
Click to continue reading HTPC Building Series: The Final Tally
HTPC Building Series: Laying out all the components
Posted by Andru Edwards Categories: Features, HDTV, Home Entertainment, Movies, PC / Laptop,
Check out our HTPC on a Budget series and join us in building a great HTPC for under $1,000.
In our quest to build the ultimate inexpensive hoome theater computer, we’ve walked you through selecting all the major components that will power our labor of love PC. I’m talking about things like why we picked our chosen motherboard, the MSI MS-7411, a look at how we will drive 7.1 sound from the HTPC to our receiver, and the smart way that we will move content to the HTPC so it’s displayed on our television.
But what about the rest? The pieces that, although not major, are still required to have a - you know - functioning HTPC? Well, that’s where this article comes in. We are going to be giving you a quick rundown of the smaller components that you will need in order to get this thing built, before we do our wrap-up in our next article.
Click to continue reading HTPC Building Series: Laying out all the components
Read More | Series: Building an HTPC on a Budget
HTPC Building Series: The ATI TV Wonder 650
Posted by Andru Edwards Categories: Features, HDTV, Home Entertainment, Movies, PC / Laptop,
Check out our HTPC on a Budget series and join us in building a great HTPC for under $1,000.
We’re starting to wind down the layout of all the parts that are going into our Home Theater PC. First, let’s recap some of the main components that we’ve thrown into this project this far:
- The process of selecting the hardware for the HTPC
- A closer look at our chosen motherboard, the MSI MS-7411
- A look at how we will drive 7.1 sound from the HTPC
- The way that we will move content to the HTPC so it’s displayed on our television
We’ve come a long way to far. In this article, though, I wanted to talk about the TV card that we’ve chosen. Since we are doing this on a budget, we are hoping for a nice balance of good performance at an inexpensive price. This is why we’ve chosen the AMD TV Wonder 650. Amazon has it for 43% off of the retail price. This card supports both over the air HD broadcasts, as well as ClearQAM cable TV.
Click to continue reading HTPC Building Series: The ATI TV Wonder 650
Read More | Series: Building an HTPC on a Budget
HTPC Building Series: Driving multimedia content to the HTPC
Posted by Andru Edwards Categories: Features, HDTV, Home Entertainment, Movies, PC / Laptop,
Check out our HTPC on a Budget series and join us in building a great HTPC for under $1,000.
Continuing our quest to build the ultimate, while inexpensive, home theater PC, the one thing you need to consider when talking about media is how you are going to actually get the media to the computer. After covering the main mission, carefully going through our selection of hardware, giving you a first hand look at the MSI motherboard we chose (and explaining exactly why we chose that one,) and then bringing you up to speed on how we are going to drive 7.1 surround sound from this thing, you were probably thinking that the brunt of the thinking was done, right? Well, while that may be the case, there are still some important considerations that need to be taken into account.
Click to continue reading HTPC Building Series: Driving multimedia content to the HTPC
Read More | Series: Building an HTPC on a Budget
HTPC Building Series: Achieving great 5.1 or 7.1 surround sound
Posted by Andru Edwards Categories: Features, HDTV, Home Entertainment, Movies, PC / Laptop,
Check out our HTPC on a Budget series and join us in building a great HTPC for under $1,000.
In previous posts, while talking about building up our Home Theater PC, from the ground up, and on a budget, we’ve focused on a few goals. Things like what we want to see the system, as a whole, do for our home entertainment experience. We’ve talked, in general, about some of the hardware we plan on ordering to put into this bad boy. We’ve even gone into detail on the one essential piece that is going to drive everything - that being the motherboard. Today we want to focus on how we are going to get amazing sound out of this system.
Click to continue reading HTPC Building Series: Achieving great 5.1 or 7.1 surround sound
Read More | Series: Building an HTPC on a Budget
HTPC Building Series: Choosing the MSI 7411 motherboard
Posted by Andru Edwards Categories: Features, HDTV, Home Entertainment, Movies, PC / Laptop,
Check out our HTPC on a Budget series and join us in building a great HTPC for under $1,000.
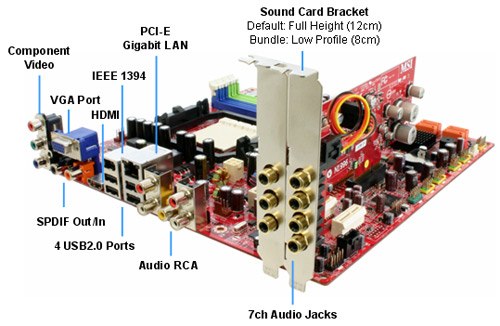
In this installment of the Home Theater PC building log, we wanted to focus on the core of our system. Previously, we took a look at the process of selecting hardware along with a look at the overall mission to build the best HTPC we can, on a budget. To understand what we are aiming to do, though, I thought it would be best if we were able to take a look at what’s going to be at the center of everything: the MSI MS-7411 Media Live DIVA 7.1 motherboard.
That’s a mouthful, we know - but it’s also an amazing centerpiece for our system. The foundation is MSI’s MS-7411 micro-ATX motherboard featuring AMD’s 780M chipset with UVD support and side-port memory for smooth 1080p playback. This motherboard can be ordered with either pre-amp or amp audio card solutions (one purchase package) directly from your distributor of choice. Note that this motherboard uses the mobile variant of the 780 for additional power savings features that are useful in a home theater environment. It pulls less power, and it doesn’t get as hot, which means much less fan noise. Nothing kills a movie experience like fan noise, seriously.
Click to continue reading HTPC Building Series: Choosing the MSI 7411 motherboard
HTPC Building Series: Selecting our hardware
Posted by Andru Edwards Categories: Features, HDTV, Home Entertainment, PC / Laptop, Videos,
Check out out HTPC on a Budget series and join us in building a great HTPC for under $1,000.
In our quest to build a great HTPC on a budget, one thing we need to think about is the hardware and software we are going to use to build and run everything. We are going to be really ambitious here, scouring deal and coupon sites to find great hardware and software at even greater prices. If you come across anything, feel free to leave a comment and let us know.
The first piece of hardware we are focusing on is a motherboard from MSI that integrates the “Maui” platform - the MSI K912GM-FIH. This is one of the biggest leaps forward in HTPC technology, and as such, we are going to build this machine around this board. In case we need to prove our case further, check out this video we did on the motherboard before its release:
Click to continue reading HTPC Building Series: Selecting our hardware
HTPC Series: Let’s build a budget HTPC
Posted by Andru Edwards Categories: Features, HDTV, Home Entertainment, PC / Laptop,
Check out out HTPC on a Budget series and join us in building a great HTPC for under $1,000.
Over the next few weeks, we are gonna be working on a special project that we hope you guys will get a kick out of. You see, as gadget enthusiasts, we know that we all love when technology can make our lives easier, or when it is just downright cool. However, recent developments in the economy are going to lead to a tightening of the budget (if it hasn’t already), and we thought we’d try and see if we can build something awesome at a reasonable price. The task? We want to build a great home theater PC (HTPC), made with great parts, for under $1000 USD. You can follow our progress at our HTPC on a Budget page. Or, if you’re too lazy to hit that link, here’s a list of topics:
- Let’s Build a Budget HTPC
- Selecting Our Hardware
- The MSI 7411 Motherboard, and Why It Rocks
- Achieving Great 5.1 or 7.1 Surround Sound
- Driving multimedia content to the HTPC
- The ATI TV Wonder 650
- Laying Out All The Components
- The Final Tally
So, what are the goals of our HTPC project? Well, besides the aforementioned $1,000 limit, we have a few other things we want out of it. First, we want it to remain fairly quiet. After all, this thing is going to be use to watch movies and television. We don’t need any extra fan noise coming from it. Secondly, we want it to put out a high definition signal, with connections that use today’s technology. Ideally, that means it will have an HDMI out port, so we can get both high definition and surround sound out of this thing.
Click to continue reading HTPC Series: Let’s build a budget HTPC


Advertisement
© Gear Live Inc. {year} – User-posted content, unless source is quoted, is licensed under a Creative Commons Public Domain License. Gear Live graphics, logos, designs, page headers, button icons, videos, articles, blogs, forums, scripts and other service names are the trademarks of Gear Live Inc.