Find Our Latest Video Reviews on YouTube!
If you want to stay on top of all of our video reviews of the latest tech, be sure to check out and subscribe to the Gear Live YouTube channel, hosted by Andru Edwards! It’s free!
Thursday December 30, 2004 3:23 pm
Logitech Harmony 688 Remote Control Review

 If there is one thing I have learned, it’s that universal remotes are never truly universal. You can go through hours and hours of setup, and there will be that one little detail that makes it remain undone. Then I heard about the Logitech Harmony 688 remote. Thre is barely any configuration here, as the remote connects via USB through your PC to an online remote code database. After just 48 hours, I have seen the light. Simply put, the Harmony 688 is the absolute best remote control I have had the pleasure to use. Ever. Find out why after the jump.
Here’s the thing - I have too many remotes for too many devices. Looking at my home entertainment center, I have a 46” Samsung DLP HDTV, a Pioneer audio receiver, a Pioneer DVR-810H TiVo/DVD Player/DVD Burner, a Comcast Motorola 6412 DVR, a Microsoft Xbox, and a Sony VCR. The TV, TiVo, and Motorola remotes all claim to be able to handle other devices. Unfortunately, they do, but very clumsily. I also bought one of those $80 All4One Khamelion remotes, which actually changes the button layout depending on what device you are trying to control. That, too, is not very intuitive and takes forever to set up. So for most of my entertainment viewing I still have to use two or three remotes depending on what I want to do. That is just unacceptable in this day and age. Then I got the Logitech Harmony 688 Remote from OfferCentric.
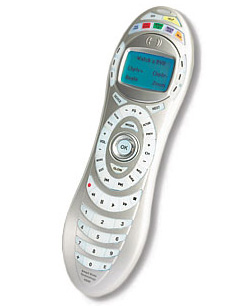
The Harmony 688 is one unique looking remote. Not to say that it’s a bad thing, as to the contrary, it is very well designed. The major feature that stands out immediately is the 84 x 48 backlit LCD screen, but more on this later. Above the LCD are 5 colored buttons labeled “Play Video”, “Play Music”, “Watch TV”, “Watch DVD”, and “More”. According to the box, these buttons are configurable so that when you press one, all of your components are set for you to do whatever the requested action is. At the bottom of the remote is an infrared sensor, used for manual training of the remote. On the top, where the signal comes out, is a mini-USB port. This is what makes the remote so cool. On the underside are two notches where your index and middle finger rest while using the remote, which is a nice touch. Lastly, the remote has all the “standard” buttons - a number pad, DVR/VCR controls, and a “Glow” key to activate the backlight.
So, I was excited to start using the remote. After all, the possibilities of this thing seemed endless. So, to get it set up correctly you need to install the Logitech Harmony Monitor. This is a small program that sits in your taskbar which senses when you have connected the Harmony 688 to your PC. When it senses that a connection has been made, it brings you to your personalized Harmony Configuration page. The unit requires 4 AAA batteries (which are included) to function. Once inserted, the LCD welcomes you with the Harmony logo.
Now, in the instruction booklet there is a nice table that you are encouraged to use to list all your devices including brand and model number. This is crucial to get everything set up perfectly. So I filled out the worksheet, and was ready to move on to the next step. The fun began, as I hooked up the remote to the PC via the USB cable. Drivers automatically installed, the Harmony Remote Setup web page came up, all without a hitch. I registered the remote and it brought me to the Create Configuration area. Now, depending on the complexity of your system, you can be here for about 30 minutes or so. It took me about 20 minutes to enter all of my components as I chose manual configuration over automatic as I prefer to see everything that it was going to program the remote to do. I did have to make some changes, such as telling it that I have both a TiVo DVR and a DVR from Comcast which I want controlled separately and view with two different TV inputs. The thing is, it is all visual on a screen in front of you as opposed to all the guesswork you usually have to do to set up universal remote controls.
When you put in all of your components, it set’s up “Activities”. For example, I set it up so that when I press the “Watch TV” activity button, the remote turns on the TV and sets it to the DVI input, turns on the receiver and sets it to the appropriate setting, and sets the Comcast DVR to the main menu. Now, this sounds like a macro, but it really is more than that. By pressing “Watch TV”, it also sets all the buttons on the remote to the way that it needs to be for me to operate everything without switching devices on the remote. My volume buttons control the receiver, the menu/guide/channel/DVR buttons all control the DVR, etc. All of this is learned through the configuration process.
Once you are done configuring everything, the Harmony website gathers all codes and activities you will need to operate everything. It compiles it into a file, and then loads that file directly to the remote via the USB cable.
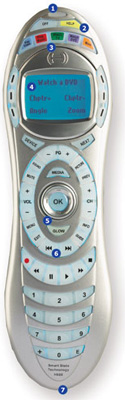
1. USB Plug ‘n Play
After completing the Web Wizard set-up, program the remote by simply connecting the Harmony Remote to your computer with the supplied USB cable.
2. Help Button
One touch help for any problems you might encounter.
3. Activity Buttons
Easily start your favorite Activities with just one press of a button!
4. Interactive Display
Easy to read interactive display keeps you in control and informed of what’s going on.
5. Backlight Glow
Backlighting makes the buttons and interactive display glow brightly for easy use in the dark.
6. PVR Control
Convenient access to transport controls (FF, RW, Pause, Play, etc.) makes using PVR/Tivo functions second nature.
7. Learning Ports
Just point your original remote at the Learning Port to capture and use any infrared command with the Harmony Remote.
So the remote should now be all configured. I disconnect the USB cable, and the LCD screen tells me that the remote is assuming that all of my components are off. Well, the TV, receiver, and DVR were all on. I didn’t want it to mess with the power of the DVR, so I went back into the configuration and made that change so that the DVR is always left on. Okay, back to the testing. It still assumed everything was off. It instructed me to press the “Help” button if that wasn’t the case. I pressed it, and in an instant all of my devices (except for the DVR) were powered off. Nice. I pressed “Watch TV”, and everything that I expected to happen did happen. In fact, it worked even better than the actual remotes for the devices. One thing that impressed me was that this remote could change to any TV input on the fly rather than having to scroll through them or use the on-screen menu (which I have to do with the stock Samsung remote). I am impressed.
I then pressed the “Watch DVD” button which I actually set at the “Watch TiVo” activity. It changed the TV input from DVI to component, the receiver to TV/Sat, and brought me to the TiVo main menu all within 3 seconds. Now all the buttons that controlled the Comcast DVR a few seconds ago now controlled the TiVo. The remote buttons are intuitive enough that you can figure out within just a couple of minutes which buttons should be used to do the things you are used to doing with the TiVo remote.
You can also control each device individually by pressing the “Device” button. Once pressed, the LCD displays the names of three of your components. If none of these three are the one you want to control, press “Next” and it scrolls through the next three and so forth. Once you find the component you want, you press the button next to the line it is displayed on in the LCD and now the whole remote is dedicated to that device. If there is a button you just can’t find, you can use the LCD screen and it will scroll through every function of the original factory remote for that device so you can access that function rather than play the guessing game.
The other nice thing about the LCD is that if someone changes, say, the TV input manually, you can press the “Help” button and it will ask you what the problem is. You answer a few questions and it figures out that the TV is on the wrong input and fixes it. I guess this is what Logitech means when it says the remote uses “Smart State Technology”.
Now, I have been singing the praises of the Harmony 688, but there is one drawback that I need to address. Some of the buttons are just too close together. You can tell that a lot of the buttons were designed to fit the stylistic look of the remote. It isn’t a problem throughout the device, but the “Menu”, “Exit”, “Info”, and ‘Guide” buttons do require just a bit of care when pressing them. I got used to it pretty quickly, but still, it shouldn’t have been an issue.
 Aside from the button issue, I really can’t find anything negative to say about this remote. It does what I have wanted a remote to do for years. It is easy to get it working, and once set up, it pretty much handles everything itself without the user having to switch from one device to the next like you would on other mid-range universal remote controls. It feels good in your hand, looks good on the coffee table, and it just works. That is enough for me.
Company: Logitech
Name: Harmony 688
Price: $147-250
Specifications
Colors: Metallic Silver, Gun-Metal Black
Software: Current system requirements: PC with USB port, Windows 98SE/Me/2000/XP or Mac OS X with Safari 1.0, Internet access, 10MB free hard drive space. Future support for Linux
Memory: 2 Megabytes Non-volatile flash memory.
Hardware: Backlit LCD 84 x 48 pixels, 56 top mounted hard buttons, Infrared sensor, USB communication, Speaker.
Infrared (IR): 3 wide dispersion high power LED’s (Range > 40 feet, sending frequency > 60 kHz, sensing frequency > 60 kHz.)
Power: While connected: USB power from PC, when not connected: 4 AAA 1.5V batteries.
Dimensions: 8.1x 2.3 x 1.3 inches
Weight: 5.8 oz
Warranty: 366 day repair/exchange warranty for factory assembly defects only.
Box contains: 688, Harmony Software Installation CD, USB cable, 4 AAA batteries, Quick Start Guide.