
Find Our Latest Video Reviews on YouTube!
If you want to stay on top of all of our video reviews of the latest tech, be sure to check out and subscribe to the Gear Live YouTube channel, hosted by Andru Edwards! It’s free!
Thursday May 12, 2005 12:14 am
HOW TO: Hack A PSOne LCD Into Your Computer


I’ve been wanting to do something neat to my computer for a long time. I thought of etching something into the side window, thought of adding water cooling, I thought of doing a bunch of things. Well, in my search ventures online to find something neat to do I found a really cool mod to do with your PC using a PSone LCD Screen. Jump on down to see how it went.
Here is what you’ll need.
- PSone LCD Screen
- Mini-Jack to Composite Video Cable
- Video Card with Video Out
- Composite to S-Video Adapter (if your Video Card doesn’t have RCA Out)
- Double Sided Stick Tape (Thick white type)
- Phillips Head Screwdriver
- Dremel with Cutting Blades
- Patience
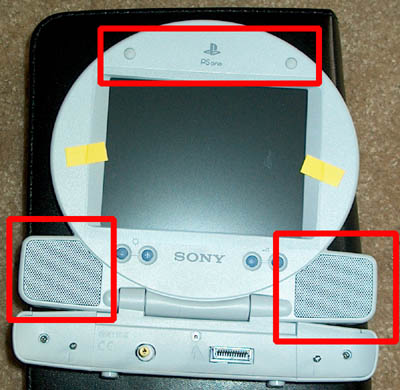
First, you need to take out the screws in the screen. In the image above there are 3 red squares. The screws are underneath both speaker grills and under the two rubber “stoppers” on the top of the screen. Once you take those out you can take a flat head screw driver or other flat item to seperate the plastic casing from the screen. Once that is done you have to get the casing off of the base of the screen. To do this all you have to do is remove the 2 screws on the left and right sides of the base and use the same method to remove the case.
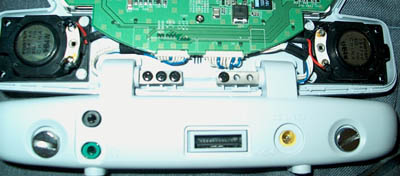
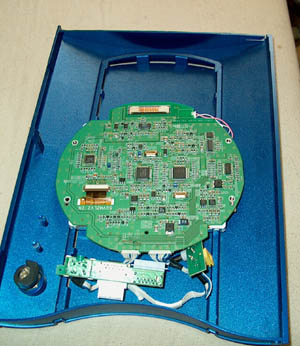
Allright! Now that the casing is off it’s time to take more screws out! If you look at the hinge of where the LCD meets the base you’ll see six screws. Before you remove them the best thing to do is to unplug the speakers from the circuit board to make life a little easier. Once the screws are removed and the speakers are unplugged you should make sure there are no extra screws to be removed because some of the screens do vary.
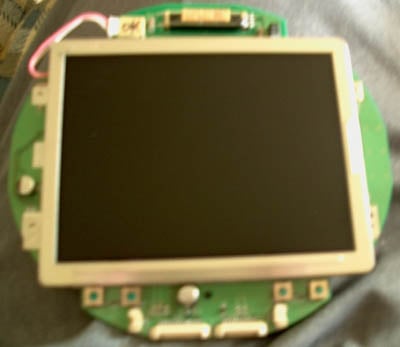
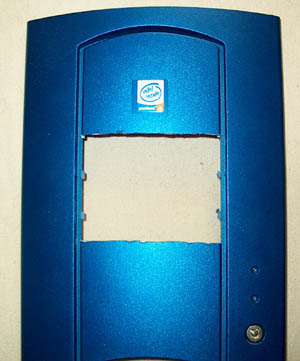
Here is the LCD screen ouside of the casing and the base board unplugged. You’ve now completed most of the work for this mod. Now all you really have to do is figure out how you want to mount it in your case and hook cables up. There are several ways you can mount the LCD. Some people will mount the LCD inside the computers open CD-Rom bays, but I have 2 drives out of 4 open spots which didn’t leave me with any room for the LCD. I decided to mount the LCD on the PC Case door. To do this I had to cut a square out of the door where the LCD would show through using my dremel. Rather than randomly cutting a square I took the casing from the LCD and traced out the size of the LCD screen on the PC door (shown below.)
Now that we’ve cut out the spot for our LCD we have to mount it to the case. The trend for mounting these is to use the foam double sided tape to stick to the circuit board and the PC case to keep it in place, so that’s what I did. Below is a picture of what the inside of the door looks like with the LCD mounted. If you look at the bottom you will see that the mini-board which takes the power and video source is now hooked up. You can choose to mount that any way you wish as long as the door still closes.
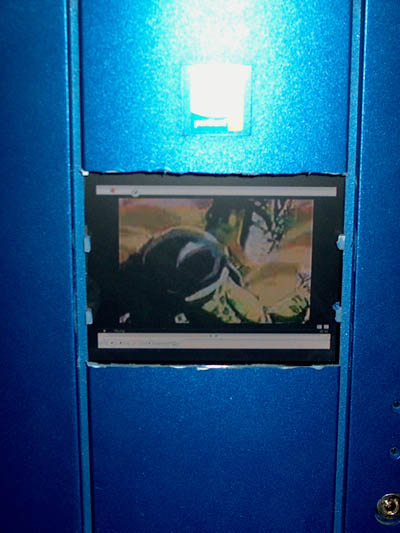
Here’s the last part! Since the LCD is mounted and ready to go you can place the door back onto the case. The way I wired everything isn’t the most visually appealing way but it works. The LCD has to pull power and rather than soddering some wires together I decided to use the power cable that came with the LCD. To make this work I fed the power cable through one of my open PCI slots on the back of my pc up through one of my 2 open CD-Rom drive bays (with the covers still on them.) Now, I’m using a ATI Radeon 9800 Pro AGP Video card which supports dual monitors and video out. You can wire the LCD directly to the VGA output on your card, but to make this easy for beginners and myself I used a simple Mini-Jack to RCA video cable to run from my video card to the LCD. I fed this cable the same way as the power cable so it would reach the LCD without cables everywhere. That’s it! Once your cables are fed, you plug them in and make sure your video card is set to use multiple monitors and you’re done! Here’s the final outcome of my project.
Like I mentioned earlier you can do this by soddering cables to your video card or a VGA cable from the LCD. Click the Read More link at the bottom of this article to see that tutorial. If you have any questions about this feel free to email me at jesse@gearlive.com. *Yes the cutting isn’t the best in the world*
- Jesse Easley
Latest Gear Live Videos
Advertisement
Advertisement


Advertisement
© Gear Live Inc. {year} – User-posted content, unless source is quoted, is licensed under a Creative Commons Public Domain License. Gear Live graphics, logos, designs, page headers, button icons, videos, articles, blogs, forums, scripts and other service names are the trademarks of Gear Live Inc.