
Find Our Latest Video Reviews on YouTube!
If you want to stay on top of all of our video reviews of the latest tech, be sure to check out and subscribe to the Gear Live YouTube channel, hosted by Andru Edwards! It’s free!
Tuesday May 10, 2005 3:11 pm
HOW TO: Back Up And Upgrade The Mac mini Hard Drive

Recently I picked up a PowerBook, and while I expected it to be “okay”, I did not expect to fall in love with OS X the way that I have. I am completely smitten. So much so that I had to pick up a Mac mini so that I would have a desktop Mac solution (and because it just calls your name when shopping at the Apple Store). The 80 GB version struck my fancy, but soon I realized that I am not one that enjoys playing mouse cursor beach ball all that much. The mini had half a gig of RAM in it, but the 4200-RPM drive was just holding me back. It was time to upgrade to a 5400 RPM 100 GB drive. Rather than taking it in to a service center where they would overcharge me, I did it on my own. If you want to upgrade your Mac mini’s hard drive, read on for our tutorial which takes a look at backing up your data, replacing your hard drive, and restoring your data.
Okay, let me preface this by saying I know how hard it can be to bring yourself to pry open your quaint little Mac. The thing is, if you bring it to a service center, they will pry it open themselves and charge you for doing so. While it is daunting, it really is a great learning experience.
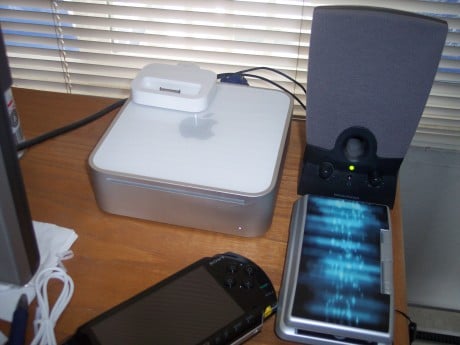
MATERIALS USED:
- Mac mini
- Replacement hard drive
- Thin putty knife
- Small Phillips screwdriver (magnetized preferred)
- iPod
- Backup 2.02
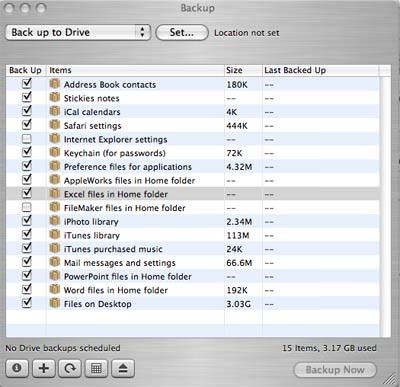
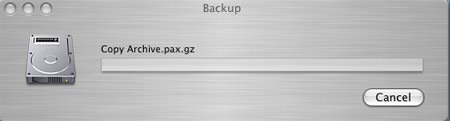
The first thing I did was back up everything to the iPod photo. The easiest way to do this is to reset the iPod, holding the Select and Menu buttons. Once the iPod reboots, hold down the Select and Play/Pause buttons to enable Target Disk Mode. The iPod will now act as an external hard drive. Start Backup, and select everything you want to save. I chose just about everything. Once everything is backed up to the iPod, you are good to go as far as proceeding with the upgrade.
So, to get started you are going to need to disconnect everything and turn your Mac mini upside down. Looking at the underside of the computer, it becomes obvious that there is no simple way to open it up. As noted in multiple places elsewhere, time to get out the putty knife. Be sure it’s clean and dry. Now shove it between the white plastic and the metal casing. Push it down until it stops, and then push firmly towards the center of the mini. You should hear a few satisfying pops. Do note that a pop and a crack are two different things. The crack is bad.
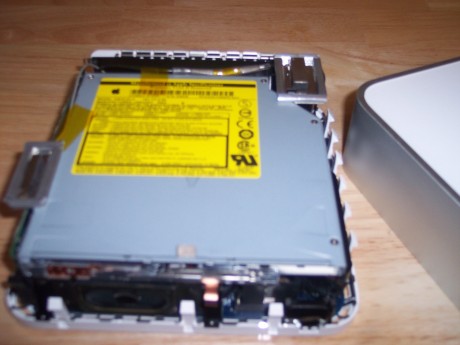
After popping the two sides and the front, you can lift the innards of the mini away from the cover. Now it’s time to go to work. At this point it’s time to break out the small Phillips screwdriver. The first think you want to do it remove the DVD drive. There are six screws in total holding it in place. The two in back are the most difficult to get out unless you have a small, thin screwdriver. After the six screws are out, the drive is easily slipped out of the daughterboard. You will notice that the hard drive is right underneath the drive, but it cannot be removed just yet. Lay the disc drive somewhere safe, and move on.
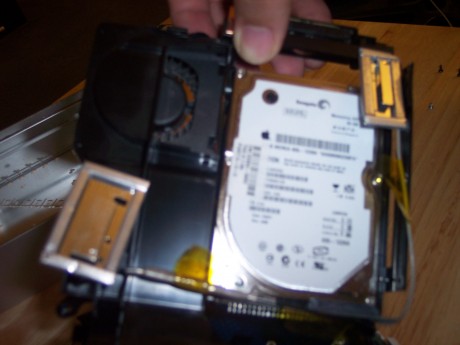
The next thing you need to do is remove the black housing from the motherboard itself. Now, if you have Bluetooth and/or Airport Express built-in to your Mac, you will need to unclip the antennas so they do not get in the way. They do look sensitive, but do not worry. Unclipping them from the casing is a snap, and the wiring is durable. There are three screws holding his housing in place, which are all located in corners. Once the screws are removed, you can lift out the casing.
There is one more piece that needs to be removed before you can get to the drive. The cooling fan is the easiest part to remove in this process. There are four tiny screws holding it in place. Remove them and the fan slides right out, giving you access to all the screws you will need to deal with to get that hard drive out.

Four larger screws hold the hard drive in. Remove them all, and the hard drive can be pulled away from the daughterboard. At this point you just need to work backwards. Put your new drive in the old drive’s place. Be sure to align the pins correctly – the set of four pins, which are at the right side of the drive, do not need to be plugged in. Screw in the hard drive, and your replacement is set. You can now screw in the fan, black casing, DVD drive, and replace the wireless antennas if you have them. You can plug everything in and test it before replacing the cover if you wish.
If your drive is brand new, this is where you will want to know what you are doing. I would have saved myself a good hour of frustration if I knew how to proceed at this point. Luckily, John Battistini was hanging out in #gizmodo and knew exactly what I was doing wrong. What happened was that after putting everything back together, I put in my Tiger installation disc, but the only drive that the setup process was allowing me to install on was my iPod. I took apart and put together the mini another two times before I went to seek help. It turns out that you need to go into the Utilities menu and format the disc to prep it for the OS X installation. Once I did that, everything went smoothly.
After going through the initial OS X setup, I downloaded the Backup 2.02 program so that I could restore from the iPod. My backup was about 27 GB, and the restore took about 10 minutes. Once complete, I rebooted and just about all of my settings were the way I left them. There were a few programs that needed to be reinstalled, but it was no big deal.
As for the actual hard drive upgrade? I have noticed a definite speed increase. We will have a follow-up article looking at the drive we used. The only real hurdle in this process is popping the cap off of the computer. The fear of breaking or damaging the aesthetics of the mini always loom in your mind when you pick up the putty knife. Quench that fear, and it really is a breeze.
Latest Gear Live Videos
Advertisement
Advertisement


Advertisement
© Gear Live Inc. {year} – User-posted content, unless source is quoted, is licensed under a Creative Commons Public Domain License. Gear Live graphics, logos, designs, page headers, button icons, videos, articles, blogs, forums, scripts and other service names are the trademarks of Gear Live Inc.