
3 steps to easily remove pomegranate seeds

Posted by Andru Edwards Categories: Features, How To, Fruit,
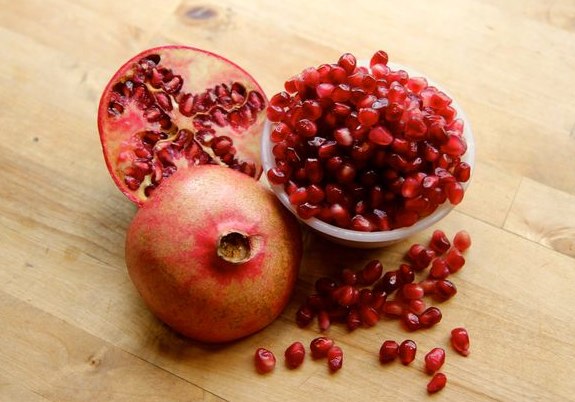
If you've ever eaten a pomegranate, you've likely encountered the frustrating task of removing the seeds--but there's a better way. Rather than fighting a spoon (or your fingers) through the various nooks and crannies, splattering yourself with pomegranate juice stains in the process, try this much easier, faster approach to deseed a pomegranate:
- Cut off the ends of the pomegranate, creating two flat surfaces on the ends.
- Cut the pomegranate in half, and twist each half a bit to loosen the delicious seeds that are held within
- Grab something sturdy like a wooden spoon, and hit the flat part of the pomegranate half that you created in the first step. The seeds should easily fall out, so make sure you have a bowl or container underneath the pomegranate that you're hitting
- Enjoy!
Give it a try, and let us know how it works out for you in the comments! If you want more a more detailed tutorial full of pictures, head on over to Instructables.
Read More  | Instructables
Gallery: 3 steps to easily remove pomegranate seeds


Advertisement
How to reheat steak without drying it out
Posted by Andru Edwards Categories: Videos, How To, Beef, Meat,
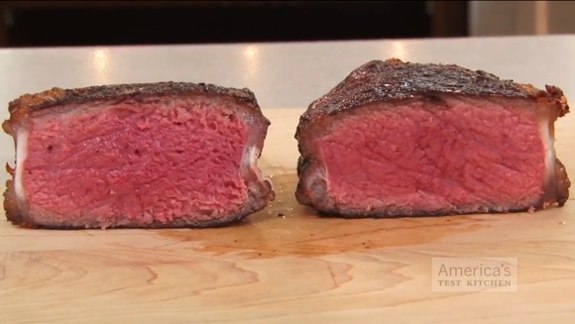
Have you ever has an amazing steak, cooked to perfection, that you just couldn't finish? You get it boxed up and put it in the fridge, looking forward to finishing the tasty leftover morsels the next day. Then you heat it up, only to find that it's dry and tough. What happened? Why?? More importantly, what can be done to avoid your delectable dinner from turning into a disgusting disaster? The folks over at America's Test Kitchen have found that the best way to reheat steaks is as follows:
- First, pre-heat your oven to 250 degrees
- Place the steaks in the oven on a wire rack for about 30 minutes until they reach 110 degrees at the center
- Take out of over and pat dry
- Heat 2 tablespoons vegetable oil in a pan until hot
- Place steaks in pan and sear until brown, abotu 60-90 seconds per side
The end result here is that your steak will be only slightly less juicy than it was originally, and that means deliciousness. If you wanna see the process in action, check out the video after the break.
Click to continue reading How to reheat steak without drying it out
Gallery: How to reheat steak without drying it out
How to: Slice a bagel into two linked halves
Posted by Andru Edwards Categories: Breakfast, Science, How To, Strange Food, Grains,

Here’s a cool food hack that we just came across and had to share. Did you know that you can technically slice a bagel in such a way that the two halves are linked? Even better, when cut this way you get a little more surface area than the old school slice, which means that you can technically fit a bit more spread and goodness on it as well. Don’t believe me? Hit the link below for the full details, with diagrams on showing exactly where to cut the bagel and everything.
Read More | Mobius Sliced Linked Bagel
Gallery: How to: Slice a bagel into two linked halves
Video: How to Eat a Chicken Wing
Posted by Andru Edwards Categories: Videos, How To, Poultry,
Yeah, if you thought you knew how to consume a chicken wing correctly, you may in fact be sadly mistaken. Chef John from Food Wishes put together the video above that shows how to eat the flat part of the chicken wing for maximum meat and deliciousness consumption. Give it a look, and enjoy your new knowledge.
Gallery: Video: How to Eat a Chicken Wing
Sprouting and Dehydrating Seeds and Grains

Posted by Jenni Burns Categories: How To, Grains, Vegan, Vegetarian, America, Dehydration,

Sprouting grains and seeds is easy and fun. The health benefits are well worth the extra work. You can sprout wheat berries, barley, buckwheat, alfalfa, sesame seeds, and flax seeds, to name a few. When the seed or grain sprouts, nutrients are released during the growing process that are not present in the seed or grain by itself. By sprouting, dehydrating, then grinding your grains, you are creating flour that is many times more nutrient rich than any flour you can purchase in the store. I love watching my food grow, it’s inspiring!
Step 1: Soaking
The first step is to soak the seeds or grains. Place the seeds or grains in a large pot overnight (the size of the pot depends on how much flour or sprouts you will need, keep in mind that soaking causes the grains to expand as they absorb the water).
Step 2: Rinsing
After the overnight soak, you will want to pour your grains into a colander, about half full, and rinse. When I rinse them I like to get my hands in there to mix it up to make sure that all the grains are well rinsed. Do this 2-3 times a day until the sprouts form, you want the sprout to be about 1/4 inch in length. Each seed and grain has a different germination phase. Wheat berries take around 48 hours while quinoa sprouts in as little as 12 hours.

Step 3: Dehydrating
Depending on what you are planning to use the sprouts for, you may or may not choose to dehydrate your seeds or grains. I use my sprouted wheat to make bread flour and buckwheat to make Buckwheatie Bars. Dehydrating is simple. Just give the sprouts one last rinse and place them on the dehydrating trays. It usually only takes around 4-6 hours to dry. Use your dehydrated sprouts quickly, or store in an airtight container in the refrigerator up to a month or so.
Gallery: Sprouting and Dehydrating Seeds and Grains
Advertisement
© Gear Live Media, LLC. 2007 – User-posted content, unless source is quoted, is licensed under a Creative Commons Public Domain License. Gear Live graphics, logos, designs, page headers, button icons, videos, articles, blogs, forums, scripts and other service names are the trademarks of Gear Live Inc.